|
|
nzbin编译
我正在开发一个需要再次使用碰撞检测的游戏。我通常会使用简单高效的盒模型碰撞检测。盒子模型的主要原则就是把所有的物体都抽象成正方形,如果两个正方形有重叠,就认为是一次碰撞。这通常是一个简单的游戏所需要的。但是因为这种模型我之前用过多次,我想尝试一些更深刻更准确的方法。
我选择从像素级层面来看是否发生了碰撞。首先我要了解“像素是什么”。我测试的元素透明度都不为0,换句话说,所有的可见像素都被看做一个碰撞点。为了提高算法效率,我预先创建了一张图片的像素映射图。换句话说,就是一个数组内包含了屏幕上的所有可见像素。
- /* 描述像素图的伪代码 */
- var pixelMap = [];
- for( var y = 0; y < image.width; y++ ) {
- for( var x = 0; x < image.height; x++ ) {
- // 获取当前位置的元素
- var pixel = ctx.getImageData( x, y, 1, 1 );
- // 判断透明度不为0
- if( pixel.data[3] != 0 ) {
- pixelMap.push( { x:x, y:y } );
- }
- }
- }
- return pixelMap;
用这种方法,一张小图片会变得很大。一张40X40的图片会有1600像素,所以如果我在一个很大的canvas上做碰撞检测将会非常缓慢。测试之前我先将盒子模型重叠起来,如果点击测试返回true,我会进一步测试是否有像素重叠。这意味着我们只需要测试一次。
- /* 盒模型测试, 碰撞返回 true */
- function hitBox( source, target ) {
- /* 源物体和目标物体都包含 x, y 以及 width, height */
- return !(
- ( ( source.y + source.height ) < ( target.y ) ) ||
- ( source.y > ( target.y + target.height ) ) ||
- ( ( source.x + source.width ) < target.x ) ||
- ( source.x > ( target.x + target.width ) )
- );
- }
如果hitBox函数返回true,我们需要比较两个物体的预渲染像素图。然后我们需要测试源物体的每一个像素是否与目标物体的像素有重叠。这是一个非常耗时耗能的函数。其实源物体的每个像素与目标物体的每个像素的匹配需要检测n*x次。假如我们匹配两个40*40像素的正方形,最坏的情况就是,经过2560000次的计算而没有得到一次匹配。
- /* 像素碰撞检测的伪代码 */
- function pixelHitTest( source, target ) {
- // 循环源图像的所有像素
- for( var s = 0; s < source.pixelMap.length; s++ ) {
- var sourcePixel = source.pixelMap[s];
- // 添加位置偏移
- var sourceArea = {
- x: sourcePixel.x + source.x,
- y: sourcePixel.y + source.y,
- width: 1,
- height: 1
- };
-
- // 循环目标图像的所有像素
- for( var t = 0; t < target.pixelMap.length; t++ ) {
- var targetPixel = target.pixelMap[t];
- // 添加位置偏移
- var targetArea = {
- x: targetPixel.x + target.x,
- y: targetPixel.y + target.y,
- width: 1,
- height: 1
- };
-
- /* 使用之前提到的 hitbox 函数 */
- if( hitBox( sourceArea, targetArea ) ) {
- return true;
- }
- }
- }
- }
当我把物体描绘出来,我几乎没有时间测试物体是否发生了碰撞。如果我们想要一个平滑的60帧动画(我相信大多数浏览器倾向于requestAnimationFrame函数),除了浏览器进程和帧渲染的时间,理论上我们测试两帧的时间只有16.6ms(实际的时间更少)。
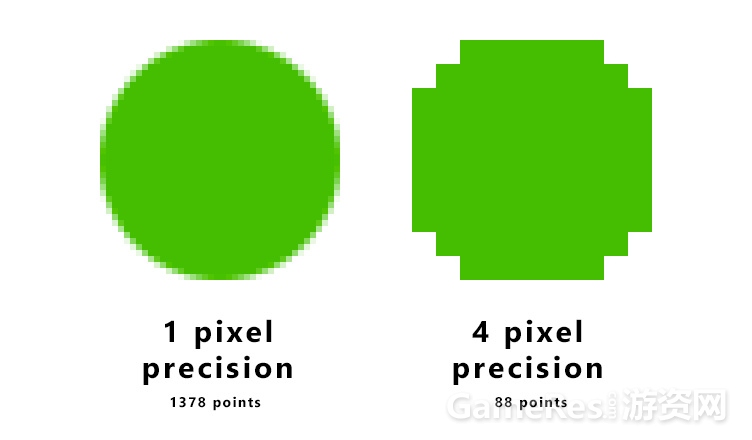
为了解决这个问题,我们可以使用更大的分辨率。我们可以测试一组像素而不是单个像素。所以如果我们在像素图渲染器和像素碰撞测试中使用更大的分辨率,我们必须把计算量降到一个合理的数字上。

- /* 描绘更大分辨率像素图的伪代码 */
- function generateRenderMap( image, resolution ) {
- var pixelMap = [];
- for( var y = 0; y < image.width; y=y+resolution ) {
- for( var x = 0; x < image.height; x=x+resolution ) {
- // 获取当前位置的像素群
- var pixel = ctx.getImageData( x, y, resolution, resolution );
-
- // 判断像素群的透明度不为0
- if( pixel.data[3] != 0 ) {
- pixelMap.push( { x:x, y:y } );
- }
- }
- }
- return {
- data: pixelMap,
- resolution: resolution
- };
- }
-
- /* 像素碰撞测试伪代码 */
- function pixelHitTest( source, target ) {
-
- // 源对象和目标对象包含两张属性
- // { data: a render-map, resolution: The precision of the render-map}
-
- // 循环源对象的所有像素
- for( var s = 0; s < source.pixelMap.data.length; s++ ) {
- var sourcePixel = source.data.pixelMap[s];
- // 添加位置偏移
- var sourceArea = {
- x: sourcePixel.x + source.x,
- y: sourcePixel.y + source.y,
- width: target.pixelMap.resolution,
- height: target.pixelMap.resolution
- };
-
- // 循环源对象的所有像素
- for( var t = 0; t < target.pixelMap.data.length; t++ ) {
- var targetPixel = target.pixelMap.data[t];
- // 添加位置偏移
- var targetArea = {
- x: targetPixel.x + target.x,
- y: targetPixel.y + target.y,
- width: target.pixelMap.resolution,
- height: target.pixelMap.resolution
- };
-
- /*使用之前提到的 hitbox 函数 */
- if( hitBox( sourceArea, targetArea ) ) {
- return true;
- }
- }
- }
- }
同样的40X40的像素块如今只有100组像素点,而之前是有1600像素的图像。我们将2650000次的计算量降低到10000次的计算量,只有原始 计算量的0.39%。如果你有更多不同分辨率的渲染图,你会建立精度更高的系统,从分辨率大的像素群开始依次计算,当然系统的复杂度也会逐渐提高。在两个 40X40像素的圆形物体上使用3的分辨率(13.33X13.33),当前的方案在最差的碰撞测试中会耗时1-2ms。
相关阅读:安全开发之碰撞检测与伤害计算逻辑
|
|