|
|
效果预览
实现步骤
整体思路是先使用 PolyBool 计算多边形,接着使用 cc.PhysicsChainCollider 将多边形围起来,最后使用 cc.Graphics 将整个地形绘制出来。
引入 PolyBool
PolyBool是什么?对多边形(并集,交集,差,异或)进行运算。(Boolean operations on polygons (union, intersection, difference, xor).)
前往 https://github.com/voidqk/polybooljs 下载。并作为插件脚本。
这个仓库有个 PR 提供了一个声明文件,因为我用的是 TypeScript ,我就把它拿来改改用了。
参考这个库的示例,里面有一个 regions 三维数组记录多边形的信息。
我们也用个三维数组记录当前多边形的形状的数据,并初始化为一个长方形吧!
- private _regions: number[][][] = [];
- reset() {
- this._regions = [
- [[-480, -320], [-480, 250], [480, 250], [480, -320]]
- ];
- }
添加物理链条
先在场景中添加物理节点。
为这个节点初始化一些 cc.PhysicsChainCollider ,并开启物理引擎,顺便开启物理调试模式,方便看效果。
- //onLoad() {
- cc.director.getPhysicsManager().enabled = true;
- cc.director.getPhysicsManager().debugDrawFlags = 1;
- for (let index = 0; index < 100; index++) {
- const c = this.node_dirty.addComponent(cc.PhysicsChainCollider);
- c.loop = true;
- c.enabled = false;
- }
接着根据_regions的数值,把points传给物理链条。
- // draw() {
- const chains = this.node_dirty.getComponents(cc.PhysicsChainCollider);
- chains.forEach((c) => {
- c.enabled = false;
- })
- for (let index = 0; index < this._regions.length; index++) {
- const pos = this._regions[index];
- let poly = chains[index];
- if (!poly) {
- poly = this.node_dirty.addComponent(cc.PhysicsChainCollider);
- poly.loop = true;
- }
- poly.points.length = 0;
- poly.points = pos.map((v, i) => {
- const v2 = cc.v2(v[0], v[1])
- return v2;
- });
- poly.enabled = true;
- }
看看效果。
开始挖洞!
监听一个节点的触摸事件。
- // onLoad() {
- this.node_dirty.on(cc.Node.EventType.TOUCH_START, this._touchMove, this);
- this.node_dirty.on(cc.Node.EventType.TOUCH_MOVE, this._touchMove, this);
- 在触摸点周围圈一个多边形(类似画一个圈,不清楚的话可以参考上一篇中的把圆围成一个圈),并使用差集的方法计算新的多边形,计算后再重新画物理链条。
- // const DIG_RADIUS = 50;
- // const DIG_FRAGMENT = 12;
- // _touchMove(touch: cc.Touch) {
- const regions = [[]];
- const pos = this.node_dirty.convertToNodeSpaceAR(touch.getLocation());
- const count = DIG_FRAGMENT;
- for (let index = 0; index < count; index++) {
- const r = 2 * Math.PI * index / count;
- const x = pos.x + DIG_RADIUS * Math.cos(r);
- const y = pos.y + DIG_RADIUS * Math.sin(r);
- regions[0].push([x, y]);
- }
- const result = PolyBool.difference({
- regions: this._regions,
- inverted: false
- }, {
- regions,
- inverted: false
- });
- this._regions = result.regions;
- this.draw();
看看效果。
填充颜色
先画一个多边形,只需先移动到起点,然后逐一划线,就可以了。
- // private _drawPoly(ctx, poly) {
- poly.forEach((pos, i) => {
- if (i === 0)
- ctx.moveTo(pos.x, pos.y);
- else
- ctx.lineTo(pos.x, pos.y);
- ctx.close();
- });
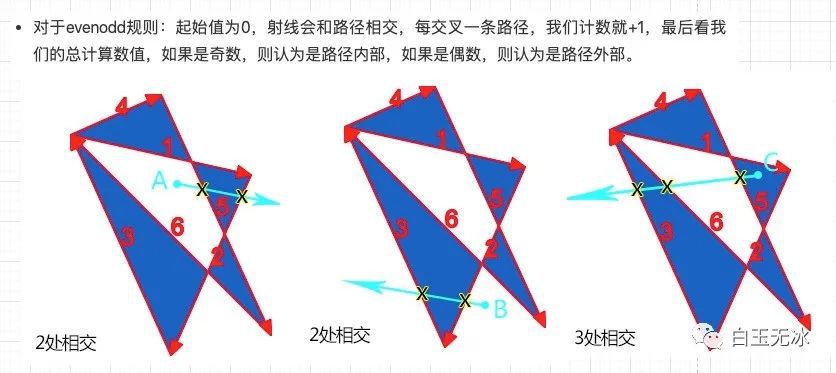
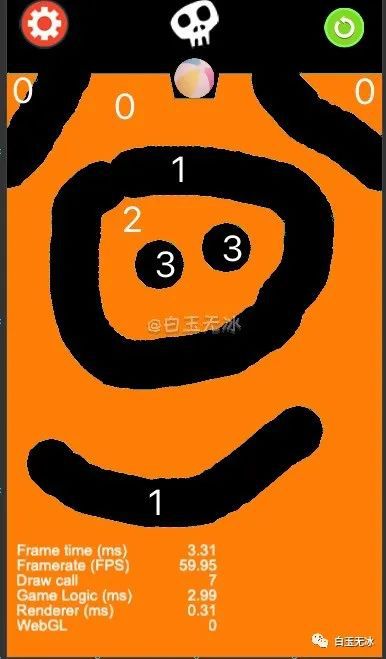
填充思路是基于 canvas 中的 evenodd 规则。

与上面不一样的地方是,我是计算这个多边形被几个大的多边形包围,当是偶数的时候填充泥土的颜色,当是奇数时,填充背景的颜色。

当然,需要注意的是,计数越大的要越后画,这样才能达到最终效果。
- // draw() {
- const enabled_chains_points=[]
- for (let index = 0; index < this._regions.length; index++) {
- // 省略与上面相同 draw
- enabled_chains_points[index] = poly.points;
- }
- this.graphics.clear(true);
- const enabled_chains_points_sort = enabled_chains_points.map((curPoly, curPoly_i) => {
- const count = enabled_chains_points.reduce((pre, nextPoly, nextPoly_i) => {
- if ((curPoly_i != nextPoly_i)) {
- const length = curPoly.length;
- for (let i = 0; i < length; ++i) {
- const p0 = curPoly[i];
- if (!cc.Intersection.pointInPolygon(p0, nextPoly))
- return pre;
- }
- return pre + 1;
- }
- return pre;
- }, 0);
- return { curPoly, count };
- }).sort((a, b) => {
- return a.count - b.count;
- })
- enabled_chains_points_sort.forEach(({ curPoly, count }) => {
- this.graphics.fillColor = count % 2 === 0 ? cc.Color.ORANGE : cc.Color.BLACK;
- this._drawPoly(this.graphics, curPoly);
- this.graphics.fill();
- })
看看效果如何!
优化
物理引擎
调低物理引擎的步长和处理的迭代次数。
- // onLoad() {
- // 开启物理步长的设置
- cc.director.getPhysicsManager().enabledAccumulator = true;
- // 物理步长,默认 FIXED_TIME_STEP 是 1/60
- cc.PhysicsManager.FIXED_TIME_STEP = 1 / 30;
- // 每次更新物理系统处理速度的迭代次数,默认为 10
- cc.PhysicsManager.VELOCITY_ITERATIONS = 8;
- // 每次更新物理系统处理位置的迭代次数,默认为 10
- cc.PhysicsManager.POSITION_ITERATIONS = 8;
多边形的顶点
计算的过程中,可能会带有小数,我们可以把所有的点都优化到整数范围。
- //const DIG_OPTIMIZE_SIZE = 1;
- private _optimizePoint(point) {
- return [Math.floor(point[0] * DIG_OPTIMIZE_SIZE) / DIG_OPTIMIZE_SIZE, Math.floor(point[1] * DIG_OPTIMIZE_SIZE) / DIG_OPTIMIZE_SIZE];
- }
DIG_OPTIMIZE_SIZE也可以改大一点,就是把图中红色的点都算作灰色的点。
多边形的边
需要剔除一些长度为0的边。
去除一些共线的边,这边用到了向量的叉乘,关于向量的点乘和叉乘介绍可以参考之前的这一篇文章。
- private _optimizeRegions() {
- const regions = [];
- for (let index = 0; index < this._regions.length; index++) {
- const pos = this._regions[index];
- const newPos = [];
- pos.forEach((p, i) => {
- p = this._optimizePoint(p);
- const p_pre = this._optimizePoint(pos[(i - 1 + pos.length) % pos.length]);
- const p_next = this._optimizePoint(pos[(i + 1) % pos.length]);
- const vec1 = cc.v2(p[0] - p_pre[0], p[1] - p_pre[1]);
- const vec2 = cc.v2(p_next[0] - p[0], p_next[1] - p[1]);
- if (vec1.lengthSqr() != 0 && vec2.lengthSqr() != 0 && vec1.cross(vec2) != 0) {
- newPos.push(p);
- }
- })
- if (newPos.length > 2) {
- regions.push(newPos);
- }
- }
- this._regions = regions;
- }
触摸平滑连续
当手指滑动时,如果 touch_move 的抓取的两个点距离比较大的话,就会出现不平滑的情况。
这里用到向量的点乘帮助我们解决这个问题,不清楚向量计算参考之前的这一篇文章。
算出两个触摸点和各自边的向量,与移动的方向向量关系,可以确定整个多边形的点。
当两个偏移点距离太小我们就忽略。
- // private _touchMove(touch: cc.Touch) {
- const regions = [[]];
- const pos = this.graphics.node.convertToNodeSpaceAR(touch.getLocation());
- const delta = touch.getDelta();
- const count = DIG_FRAGMENT;
- if (delta.lengthSqr() < 5) {
- for (let index = 0; index < count; index++) {
- const r = 2 * Math.PI * index / count;
- const x = pos.x + DIG_RADIUS * Math.cos(r);
- const y = pos.y + DIG_RADIUS * Math.sin(r);
- regions[0].push(this._optimizePoint([x, y]));
- }
- } else {
- const startPos = pos.sub(delta);
- for (let index = 0; index < count; index++) {
- const r = 2 * Math.PI * index / count;
- let vec_x = DIG_RADIUS * Math.cos(r);
- let vec_y = DIG_RADIUS * Math.sin(r);
- let x, y;
- if (delta.dot(cc.v2(vec_x, vec_y)) > 0) {
- x = pos.x + vec_x;
- y = pos.y + vec_y;
- } else {
- x = startPos.x + vec_x;
- y = startPos.y + vec_y;
- }
- regions[0].push(this._optimizePoint([x, y]));
- }
- }
调用 PolyBool 的优化
在这个库 https://github.com/voidqk/polybooljs 中提到了更高级的用法。
- // private _touchMove(touch: cc.Touch) {
- const seg1 = PolyBool.segments({
- regions: this._regions,
- inverted: false
- });
- const seg2 = PolyBool.segments({
- regions,
- inverted: false
- });
- const comb = PolyBool.combine(seg1, seg2);
- const result = PolyBool.polygon(PolyBool.selectDifference(comb));
其他
另一种实现思路
首先创建一堆刚体铺满所有泥土,在监听到触摸事件后,移除对应位置的刚体。
算法参考
多边形算法我没有深究其实现,如果要做到更好的优化,可能需要自己去实现其中的算法,可以把上面的优化点融入到算法中。以下是一些相关算法的参考资料。
•http://www.cs.ucr.edu/~vbz/cs230papers/martinez_boolean.pdf
•https://hal.inria.fr/inria-00517670/document
•https://www.sciencedirect.com/sc ... i/S0965997813000379
可能的问题
在web端测试感觉比较流畅,未在native端测试,也没有在微信小游戏端做测试。
小结
可能有其他更好的方案去实现这个功能,如果你有更好的方案,欢迎分享!欢迎加入qq交流群(859642112)一起讨论,群里收集了一些我认为还不错的书籍和资料。
效果预览
实现步骤
整体思路是,先用 Clipper 去计算多边形,接着用 poly2tri 将多边形分割成多个三角形,最后用多边形刚体填充。
引入第三方库
Clipper
Clipper 是一个强大的用于多边形计算的运算库。前往下面这个地址下载,并作为插件导入 creator 。
http://jsclipper.sourceforge.net
为什么这次不用 物理挖洞-实现篇 中的 PolyBool 呢?
经测试发现 Clipper 的效率会比 PolyBool 高,并且 Clipper 内置了一个方法可以明确知道哪些多边形是洞。
poly2tri
poly2tri 是一个把多边形分割成三角形的库。下载地址如下:
https://github.com/r3mi/poly2tri.js
poly2tri 的使用有一些要注意的,大致就是不能有重复的点,不能有相交的形状。
初始化准备
先在场景中添加一个物理节点,一个绘图组件(用来画图)。
接着把物理引擎打开,监听触摸事件。
- // onLoad() {
- // 多点触控关闭
- cc.macro.ENABLE_MULTI_TOUCH = false;
- cc.director.getPhysicsManager().enabled = true;
- this.node_dirty.on(cc.Node.EventType.TOUCH_START, this._touchMove, this);
- this.node_dirty.on(cc.Node.EventType.TOUCH_MOVE, this._touchMove, this);
- // }
扩展多边形碰撞的组件
为了方便管理多边形碰撞组件,新建一个脚本 PhysicsPolygonColliderEx.ts。
初始化
因为物理碰撞体需要物理刚体,我们可以加一些限制,并把这个菜单指向物理碰撞体的菜单中。
- const { ccclass, property, menu, requireComponent } = cc._decorator;
- @ccclass
- @menu("i18n:MAIN_MENU.component.physics/Collider/PolygonEX-lamyoung.com")
- @requireComponent(cc.RigidBody)
- export default class PhysicsPolygonColliderEx extends cc.Component {
- }
我们就可以在刚体节点中添加这个插件脚本了。
既然要用到多边形碰撞体,就定义一个多边形碰撞体数组。
- private _physicsPolygonColliders: cc.PhysicsPolygonCollider[] = [];
因为 Clipper 中计算的结构是 {X,Y}。
所以加个变量记录多边形顶点信息。
- private _polys: { X: number, Y: number }[][] = [];
因为不同的库用的数据结构不同,所以添加两个转换方法。
- private _convertVecArrayToClipperPath(poly: cc.Vec2[]) {
- return poly.map((p) => { return { X: p.x, Y: p.y } });
- }
- private _convertClipperPathToPoly2triPoint(poly: { X: number, Y: number }[]) {
- return poly.map((p) => { return new poly2tri.Point(p.X, p.Y) });
- }
加一个初始化数据的接口。
- init(polys: cc.Vec2[][]) {
- this._polys = polys.map((v) => { return this._convertVecArrayToClipperPath(v) });
- }
计算多边形
参考 Clipper 中的使用例子,写一个多边形差集调用。
- //polyDifference(poly: cc.Vec2[]) {
- const cpr = new ClipperLib.Clipper();
- const subj_paths = this._polys;
- const clip_paths = [this._convertVecArrayToClipperPath(poly)]
- cpr.AddPaths(subj_paths, ClipperLib.PolyType.ptSubject, true);
- cpr.AddPaths(clip_paths, ClipperLib.PolyType.ptClip, true);
- const subject_fillType = ClipperLib.PolyFillType.pftEvenOdd;
- const clip_fillType = ClipperLib.PolyFillType.pftEvenOdd;
- const solution_polytree = new ClipperLib.PolyTree();
- cpr.Execute(ClipperLib.ClipType.ctDifference, solution_polytree, subject_fillType, clip_fillType);
- const solution_expolygons = ClipperLib.JS.PolyTreeToExPolygons(solution_polytree);
- this._polys = ClipperLib.Clipper.PolyTreeToPaths(solution_polytree);
分割多边形并添加刚体
参考 poly2tri 中的使用,写一个多边形分割成三角形的调用。记得要把上面返回的数据转成 poly2tri 中可以使用的数据格式。
- // polyDifference(poly: cc.Vec2[]) {
- let _physicsPolygonColliders_count = 0;
- for (const expolygon of solution_expolygons) {
- const countor = this._convertClipperPathToPoly2triPoint(expolygon.outer);
- const swctx = new poly2tri.SweepContext(countor);
- const holes = expolygon.holes.map(h => { return this._convertClipperPathToPoly2triPoint(h) });
- swctx.addHoles(holes);
- swctx.triangulate();
- const triangles = swctx.getTriangles();
- // 逐一处理三角形...
- }
然后再逐一处理分割好的三角形,修改 cc.PhysicsPolygonCollider 的 points 属性。
- // 逐一处理三角形...
- for (const tri of triangles) {
- let c = this._physicsPolygonColliders[_physicsPolygonColliders_count];
- if (!c) {
- //没有的话就创建
- c = this.addComponent(cc.PhysicsPolygonCollider);
- c.friction = 0;
- c.restitution = 0;
- this._physicsPolygonColliders[_physicsPolygonColliders_count] = c;
- }
- c.points = tri.getPoints().map((v, i) => {
- return cc.v2(v.x, v.y)
- });
- c.apply();
- _physicsPolygonColliders_count++;
- }
- // 剩余不要用的多边形清空。
- this._physicsPolygonColliders.slice(_physicsPolygonColliders_count).forEach((v => {
- if (v.points.length) {
- v.points.length = 0;
- v.apply();
- }
- }));
绘制泥土
只要在遍历三角形的时候逐点画线就行了。
- if (i === 0) ctx.moveTo(v.x, v.y);
- else ctx.lineTo(v.x, v.y);
添加命令队列
为了不让每帧计算量过多,添加一个命令队列。
- private _commands: { name: string, params: any[] }[] = [];
- pushCommand(name: string, params: any[]) {
- this._commands.push({ name, params });
- }
在每次更新的时候,取出几个命令去执行。
- lateUpdate(dt: number) {
- if (this._commands.length) {
- // 每帧执行命令队列
- for (let index = 0; index < 2; index++) {
- const cmd = this._commands.shift();
- if (cmd)
- this[cmd.name](...cmd.params);
- else
- break;
- }
- }
- }
涂抹地形
整体思路和 物理挖洞-优化篇 和 物理挖洞-实现篇 差不多。不清楚的话,可以回看这两篇文章。
这次不同的是,加了一个涂抹步长控制,当涂抹间隔太小的时候,就不参与计算。
- private _touchStartPos: cc.Vec2;
- private _touchStart(touch: cc.Touch) {
- this._touchStartPos = undefined;
- this._touchMove(touch);
- }
- private _touchMove(touch: cc.Touch) {
- const regions: cc.Vec2[] = [];
- const pos = this.graphics.node.convertToNodeSpaceAR(touch.getLocation());
- const count = DIG_FRAGMENT;
- if (!this._touchStartPos) {
- // 画一个圆(其实是多边形)
- for (let index = 0; index < count; index++) {
- const r = 2 * Math.PI * index / count;
- const x = pos.x + DIG_RADIUS * Math.cos(r);
- const y = pos.y + DIG_RADIUS * Math.sin(r);
- regions.push(this._optimizePoint([x, y]));
- }
- this._touchStartPos = pos;
- } else {
- const delta = pos.sub(this._touchStartPos);
- // 手指移动的距离太小的话忽略
- if (delta.lengthSqr() > 25) {
- // 这里是合并成一个顺滑的图形 详细上一篇文章
- const startPos = this._touchStartPos;
- for (let index = 0; index < count; index++) {
- const r = 2 * Math.PI * index / count;
- let vec_x = DIG_RADIUS * Math.cos(r);
- let vec_y = DIG_RADIUS * Math.sin(r);
- let x, y;
- if (delta.dot(cc.v2(vec_x, vec_y)) > 0) {
- x = pos.x + vec_x;
- y = pos.y + vec_y;
- } else {
- x = startPos.x + vec_x;
- y = startPos.y + vec_y;
- }
- regions.push(this._optimizePoint([x, y]));
- }
- this._touchStartPos = pos;
- }
- }
- if (regions.length)
- this.polyEx.pushCommand('polyDifference', [regions, this.graphics]);
- }
- private _touchEnd(touch: cc.Touch) {
- this._touchStartPos = undefined;
- }
作者:lamyoung
来源:微信公众号“白玉无冰”
原地址:https://mp.weixin.qq.com/s/0vqPNDUPWH760INGBNTeXA
|
|